Automatic retopology and reference tools
On this page
QuadPen can generate a first-pass mesh from the reference, simplify a heavy reference, paint a mask for selective extraction, and transfer retopology between deformed references. These are reference-side tools: they create or modify reference geometry or store data about it, rather than drawing individual quads.
Retopologize (Retopology Lab)#
QuadPen's own engine lives in the RETOPOLOGY LAB section of the inspector. It does not use any external program.
Load a reference mesh.
Expand RETOPOLOGY LAB and set Face Count (the engine lands within a few percent of it).
Optional controls: Quality (solver effort), Direction (Use Curvature or Use Guide Lines, see below), Pure quads (split every face once so not even the last few triangles stay), Final Mesh Smooth (relaxation of the result) and Hard Features with its Angle (on by default at 35°: every reference edge that bends more than the angle gets an edge loop placed exactly on it).
Click Run or press Ctrl+R. A spinner shows the elapsed time.
Review the preview. The stats show quads, triangles, ngons, target error, boundary edges and non-manifold edges. A bar at the top of the 3D view shows the face count, Both / Result / High poly (the preview starts on Both, so the high poly stays visible) and Accept / Discard. Accept (or Enter) makes the result the low poly you edit; the high poly stays as the reference and every tool works on the result. Discard (or Esc) throws it away. While the preview waits, editing tools are off. The panel's Accept, Export and Discard do the same, and Export writes the preview to a file.
How it works: the engine solves a smooth cross field (two perpendicular edge directions at every point) and a matching square lattice directly on the reference, coarse to fine, then turns the lattice into quads. Faces are traced from the connectivity itself, so the result has no holes and no non-manifold edges. Where the field turns, the lattice leaves triangles; they are joined two by two into quads, a triangle walking across the quads between it and its partner, so the result is quads. When the high poly is much finer than the quads (a sculpt of a million triangles), the field is built on a lighter, smoothed working copy, so wrinkles and veins do not turn the quads; every point of the result is still put on the real surface. This also makes a dense sculpt several times faster. Sharp edges and the borders of openings (for example a neck cut) are found first; the lattice is turned to run along them and a row of vertices is pinned exactly on them, with a fixed vertex at every corner. This is what keeps mechanical parts crisp while organic areas stay smooth, so one run handles mixed models.
What to expect: quads only on closed shapes. A few triangles can stay where hard edges or an open border wall them in: 8 in 3,027 faces on a sculpted hand with Hard Features on, none with it off; 3 in 4,986 on a head with an open neck. Expect an even edge length and clean flow over smooth forms. Where a round side meets a flat cap (a cylinder rim) the first row of quads can still be uneven. Lower the Angle to keep softer edges, raise it (or turn Hard Features off) for organic scans with noisy folds. The engine does not invent eye, mouth or ear loops: draw them with Guides (J) or add them by hand after accepting the mesh.
Pure quads removes even those last few triangles. The engine extracts the same target at a quarter of the face count and splits every face once, so the result has no triangles or ngons at the requested Face Count. The flow gets busier (fans of quads where faces were split) and very fine features and sharp-edge placement soften, so use it only for pipelines that reject any triangle.
Local quad size#
By default every quad has about the same size. Two controls make quads smaller where detail needs them; the total still matches Face Count, so quads elsewhere grow to compensate.
Scale By Curvature gives tighter bends (nose, lips, ears, rounded edges) smaller quads. Multiplier sets how strongly. Keep Details sets which bends count: at 100 every bend counts, at 50 (default) gentle curvature is ignored, at 1 only strong bends count. Sharp edges are not counted, because Hard Features already places an exact edge loop on them.
Scale By Masking gives painted areas smaller quads. Paint with the Mask tool (M); Multiplier sets how strongly. It combines with curvature.
Spread blurs the size so it grows and shrinks gradually. Size changes are also limited per distance travelled, because every change in quad size needs a few irregular vertices.
Measured on the head scan at 5,000 faces: curved areas get edges about 0.7 times as long as flat areas, and a half-painted model gets edges about 0.68 times as long on the painted side, with the irregular-vertex share unchanged (9%).
Direction: Use Curvature or Use Guide Lines#
Direction decides where the edge flow comes from.
Use Curvature lets the shape decide. You draw nothing. The edge flow runs along the hard edges the engine finds (see Hard Features) and is smooth everywhere else.
Use Guide Lines follows strokes you draw on the high poly, for example around an eye or along a limb. An edge loop is placed on every stroke, and the quads next to it run the same way.
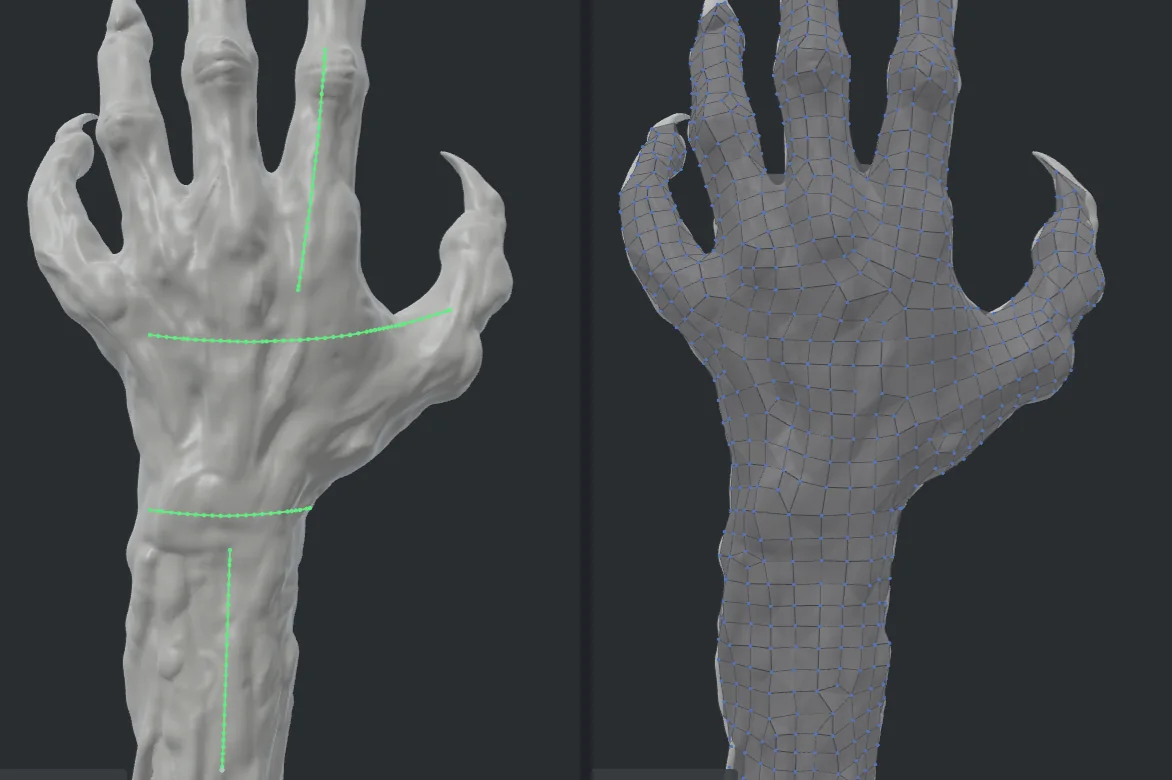
Direction is the only switch: choosing Use Guide Lines is what turns the strokes on. If no stroke is drawn, Run tells you so and does not start.
To draw guide lines, click Draw guide lines under the Lab settings (or press J for the Guides tool) and drag on the high poly where the edge loops should run. The line under the settings says how many are drawn; Clear guide lines removes them.
Join into one surface#
A sculpt is often made of pieces pushed into each other: a hand and its forearm, a head and its horns. The parts hidden inside are still there, and Retopology Lab meshes them too. You then get faces inside the model, small stray pieces and holes where the pieces meet.
Join (HIGH POLY TOOLS) turns all pieces into one closed surface with nothing left inside, like a voxel remesh (DynaMesh in ZBrush). It keeps the sculpted detail down to the size of its grid cell, which follows Triangles.
Set Triangles: about how many triangles the joined surface gets (default 1,000,000). More keeps finer detail and takes longer.
Click Join. The progress bar shows the steps.
The result is saved next to your sculpt as
<name>_joined.obj(_joined2,_joined3... when that name is taken; no file is overwritten) and shown as a preview. The status line says how many pieces there were, how fine the detail is and how long it took.Click Use as high poly (Enter) to work on it, or Discard (Esc), which also deletes the saved file. The sculpt file you loaded is never changed. A scene saved after Use as high poly opens the joined file.
Run Retopology Lab on the joined high poly.
An open end of the sculpt, such as a forearm cut off at the wrist, is closed across. Pieces that do not touch at all stay separate pieces. On a 2.1-million-triangle sculpt of a hand and forearm in two pieces, Join at 1,000,000 triangles takes about 25 seconds.
Like every voxel remesh, Join melts together parts closer than one grid cell: a gap between two fingers narrower than the detail size closes. Raise Triangles if that happens.
Remesh#
Remesh (HIGH POLY TOOLS) builds one even, watertight mesh from the high poly at about Faces faces; intersecting or separate parts, such as a body and an attached limb, are joined. Set Faces, Smooth and Triangles. The result lands within a few percent of Faces: an open end is closed and very thin parts are thickened, so QuadPen measures the result and corrects its spacing once or twice, which takes a few seconds on a heavy sculpt. Accept makes it the low poly (for a blockout); Export writes it to a file and Discard throws it away. For a low poly with clean edge flow use Retopology Lab, and for a high poly in one piece use Join.
The older Retopologize button and its options (hard edges, guides, anisotropy, mask sizing, curvature, refine, coarsen) are gone, and so is Glue, which ran the same function as Remesh. Automatic quad retopology with control over edge flow is RETOPOLOGY LAB.
Decimate reference#
Use Decimate when the reference is too heavy for comfortable navigation or retopology.
Set Decimate to a percentage from 1% to 99%.
Optionally enable Uniform edges for more even edge lengths.
Optionally enable Use mask to preserve detail in masked areas, then set Mask multiplier from 1 to 20.
Click Decimate.
Review the triangle preview, then click Use as high poly to replace the working high poly with the lighter mesh, or Export to write it to disk.
Decimation changes the reference used by later operations. Keep the original file if you may need it again.
Mask and Extract#
The Mask tool (M) paints a reference mask used by Extract, mask-driven decimation, and mask-based automatic retopology sizing.
Select Mask.
Set Mask radius as a percentage of scene size and Strength.
Paint on the reference.
Alt-drag erases.Click Clear mask to start over.
Click Extract masked. The fully masked triangles and a one-ring fringe at partially painted borders appear as a preview.
Click Use as high poly to replace the working high poly with the extracted mesh, or Export to write it to disk.
Guide Lines#
The Guide Lines tool (J) draws strokes on the reference. With Direction set to Use Guide Lines, the Retopology Lab treats each stroke like a hard edge of the model: a row of vertices is put on the stroke itself, so an edge loop runs along it, and the quads around it turn to match. Draw where you want an edge loop, not everywhere: a few well-placed strokes produce cleaner topology than a dense web. Where a stroke meets a hard edge of the model, the hard edge wins.
How closely the loops follow, measured on the hand in the picture under Direction (3,000 faces): 93% of the line across the back of the hand, 100% of the wrist line, 100% of the finger line and 79% of the forearm line have an edge running along them. The same lines against a run on Use Curvature (no guides): 7%, 48%, 10% and 17%.
Drawing a stroke and Clear guide lines can be undone with Ctrl+Z.
Morpher#
Morpher transfers the retopology from one version of a reference to another version with the same topology, such as an animation blend shape or a corrected sculpt.
With the original reference active, open MORPHER.
Click Store. QuadPen maps every scene vertex to the reference surface. Red capture dots mark vertices that could not be mapped; move them onto the surface and store again.
Load the deformed reference. It must have the same topology as the original.
Choose the Target: Active reference or a stored reference.
Click Apply. The retopology moves to the corresponding surface points.
Use Clear to discard the snapshot, or Show capture dots to inspect the stored mapping.
Suggested workflow#
Load the high-poly reference. If it is made of pieces pushed into each other, Join it first (HIGH POLY TOOLS).
Optionally draw Guide Lines (J) along the main forms.
In RETOPOLOGY LAB, set Face Count and press Ctrl+R.
Compare with Show → Both, then Accept.
Refine feature loops with Move, Draw and Bridge.
Use Remesh (HIGH POLY TOOLS) when the high poly itself must become one even, watertight mesh.
Use Morpher when the reference changes but the topology should follow.